一般情况下,我们使用word可以写出漂亮的简历。但是我们是程序员,就应该用程序员的方式来做–使用网页写简历。当然,网页简历的方式就很多了,这里我们就用vue来搞定这个事,因为它灵活、高效、方便。
Vue插件和UI框架比较丰富,我们这里就借助elementui来帮助我们快速完成网页.大家可以先去Element官方 查看相应的文档。
ElementUI快速上手 安装ElementUI和相应的插件
1
2
cnpm i element-ui -S cnpm install babel-plugin-component -D
main.js文件引入ElementUI:
1
2
3
4
5
6
7
8
9
10
11
12
13
14
15
import Vue from 'vue' import App from './App' import router from './router' import ElementUI from 'element-ui'; import 'element-ui/lib/theme-chalk/index.css'; Vue.use(ElementUI); # 完整引入 Vue.config.productionTip = false /* eslint-disable no-new */ new Vue({ el: '#app', router, components: { App }, template: '<App/>' })
在.babelrc配置babel-plugin-component,我们借助 babel-plugin-component来实现按需引入,以达到减小项目体积的目的
1
2
3
4
5
6
7
8
9
10
11
12
13
14
15
16
17
18
19
{ "presets": [ ["env", { "modules": false, "targets": { "browsers": ["> 1%", "last 2 versions", "not ie <= 8"] } }], "stage-2" ], "plugins": ["transform-vue-jsx", "transform-runtime", [ "component", { "libraryName": "element-ui", "styleLibraryName": "theme-chalk" } ]] }
現在我們就可以註冊我們需要的組件,
1
2
3
4
5
6
7
8
9
10
11
12
13
14
15
import Vue from 'vue'; import { Button, Select } from 'element-ui'; import App from './App.vue'; Vue.component(Button.name, Button); Vue.component(Select.name, Select); /* 或写为 * Vue.use(Button) * Vue.use(Select) */ new Vue({ el: '#app', render: h => h(App) });
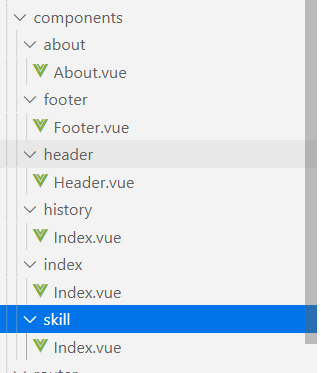
我新建了几个组件, 结构如下:router中:
1
2
3
4
5
6
7
8
9
10
11
12
13
14
15
16
17
18
19
20
21
22
23
24
25
26
27
28
29
import About from '@/components/about/About' import Skill from '@/components/skill/Index' import Index from '@/components/index/Index' import His from '@/components/history/Index' Vue.use(Router) export default new Router({ routes: [ { path: '/', name: 'Index', component: Index }, { path:'/about', name:'About', component:About },{ path:'/skill', name:'skill', component:Skill },{ path:'/his', name:'his', component:His } ] })
在首页用到了Element 的layout布局,App.vue做了如下修改:
1
2
3
4
5
6
7
8
9
10
11
12
13
14
15
16
17
18
19
20
21
22
23
24
25
26
27
28
<template> <div id="app"> <el-container> <el-header> <Header></Header> </el-header> <el-main> <router-view /> </el-main> <el-footer> <Footer></Footer> </el-footer> </el-container> </div> </template> <script> import Footer from "@/components/footer/Footer"; import Header from "@/components/header/Header"; export default { components: { Footer, Header }, name: "App" }; </script>
在Header.vue中用到了el-menu:
1
2
3
4
5
6
7
8
9
10
11
12
13
14
15
16
17
18
19
20
21
22
23
<template> <el-menu :default-active="activeIndex" class="el-menu-demo" :router="true" mode="horizontal" > <el-menu-item index="/">首页</el-menu-item> <el-menu-item index="/about">个人简介</el-menu-item> <el-menu-item index="/skill">个人技能</el-menu-item> <el-menu-item index="/his">工作经历</el-menu-item> </el-menu> </template> <script> export default { name: 'Header', data () { return { activeIndex: '/' } } } </script>
这里的组件代码来源于Vue+Element实现网页版个人简历系统 .
我之前有把博客上传到七牛云的文章,大家可以去看看。这里我只简单的走个流程:
1 qshell qupload2 --overwrite=true --rescan-local=true --src-dir=E:\vue\myresume\dist --bucket=eyiadminresume
之前也有说到将命令写入到package.json中:
1 "build": "node build/build.js & qshell qupload2 --overwrite=true --rescan-local=true --src-dir=E:/vue/myresume/dist --bucket=eyiadminresume"
这样在执行npm run build的时候,会先执行node build/build.js然后会执行qshell qupload2上传到七牛云.关于qshell的详细教程请访问https://github.com/qiniu/qshell 。resume.52fx.biz


