Spring Boot整合Mybatis Plus和Druid

Spring Boot整合Mybatis Plus和Druid

在Java中,我比较ORM熟悉就只有HibernateMybatis,其他的并未实践使用过,在这二者之间我更喜欢Mybatis,因为它精简、灵活(毕竟我是上年纪的程序员,喜欢自己写SQL)。

刚才有提到Mybatis,但是这里的重点是介绍Mybatis-Plus,它是Mybatis的增强版,如果要了解Mybatis的细节的话请点击这里

简介

MyBatis-Plus官网介绍,MyBatis-Plus(简称 MP)是一个 MyBatis 的增强工具,在 MyBatis 的基础上只做增强不做改变,为简化开发、提高效率而生。这看上去挺香的,所以必须得尝尝。
这里涉及到的环境、组件如下:

  • MariaDB 10.3.10
  • Windows 10
  • IntelliJ IDEA 2019.3.1
  • 64 bit JDK 1.8.0_231
  • Spring Boot 2.2.3.RELEASE
  • Lombok 1.18.10
  • Knife4j 2.0.1
  • Mybatis-plus 3.3.0
  • Druid

Spring Boot 整合Mybatis-Plus

我之前一直是直接用的Mybatis,但是作为喜欢偷懒的人,当然得想办法来提高我们的效率,所以就想着用Mybatis-Plus来省去一些单表的CRUD操作再结合MyBatis-Plus配套的AutoGenerator代码生成器,就能为我们节省不少时间。

引入依赖包

首先,我们得引入Mybatis-Plusmariadb-java-client等几个包:

1
2
3
4
5
6
7
8
9
10
11
12
13
14
15
16
17
18
19
<!-- https://mvnrepository.com/artifact/io.springfox/springfox-swagger2 -->
<dependency>
<groupId>com.github.xiaoymin</groupId>
<artifactId>knife4j-spring-boot-starter</artifactId>
<version>2.0.1</version>
</dependency>
<!-- https://mvnrepository.com/artifact/com.baomidou/mybatis-plus-boot-starter -->
<dependency>
<groupId>com.baomidou</groupId>
<artifactId>mybatis-plus-boot-starter</artifactId>
<version>3.3.0</version>
</dependency>

<!-- https://mvnrepository.com/artifact/org.mariadb.jdbc/mariadb-java-client -->
<dependency>
<groupId>org.mariadb.jdbc</groupId>
<artifactId>mariadb-java-client</artifactId>
<version>2.5.3</version>
</dependency>

application.yml配置我们的数据库连接信息:

1
2
3
4
5
6
7
8
9
10
11
12
13
spring:
datasource:
driver-class-name: org.mariadb.jdbc.Driver
url: jdbc:mysql://127.0.0.1:3306/nacos_config?useUnicode=true&characterEncoding=UTF-8&allowMultiQueries=true
username: root
password: root
minimum-idle: 5
maximum-pool-size: 50
auto-commit: true
idle-timeout: 30000
max-lifetime: 1800000
connection-timeout: 30000
connection-test-query: SELECT 1

这里我新建一个名为User的实体,具体属性如下:

1
2
3
4
5
6
7
8
@Data
@Builder
@TableName("users")
public class User {
private String username;
private String password;
private int enabled;
}

新建一个UserMapper接口:

1
2
public interface UserMapper extends BaseMapper<User> {
}

在我们的启动类加上@MapperScan来指定我们的Mapper扫描目录:

1
@MapperScan("com.eyiadmin.demo.mapper")

我新建一个单元测试,来试试我们的UserMapperselectList:

1
2
3
4
5
6
7
8
9
10
11
12
@RunWith(SpringRunner.class)
@SpringBootTest
public class UserTests {
@Autowired
private UserMapper userMapper;

@Test
public void testUser() {
List<User> userList = userMapper.selectList(null);
userList.forEach(System.out::println);
}
}

会看到Mybatis-Plus为我取出的数据:

1
2
3
4
2020-01-20 09:44:14.125 TRACE org.apache.ibatis.logging.jdbc.BaseJdbcLogger.trace(BaseJdbcLogger.java:149) 2CNU7X5OLAUE004 --- [           main] c.e.d.m.U.selectList                     : <==    Columns: username, password, enabled
2020-01-20 09:44:14.125 TRACE org.apache.ibatis.logging.jdbc.BaseJdbcLogger.trace(BaseJdbcLogger.java:149) 2CNU7X5OLAUE004 --- [ main] c.e.d.m.U.selectList : <== Row: nacos, $2a$10$EuWPZHzz32dJN7jexM34MOeYirDdFAZm2kuWj7VEOJhhZkDrxfvUu, 1
2020-01-20 09:44:14.131 DEBUG org.apache.ibatis.logging.jdbc.BaseJdbcLogger.debug(BaseJdbcLogger.java:143) 2CNU7X5OLAUE004 --- [ main] c.e.d.m.U.selectList : <== Total: 1
User(username=nacos, password=$2a$10$EuWPZHzz32dJN7jexM34MOeYirDdFAZm2kuWj7VEOJhhZkDrxfvUu, enabled=1)

我们再试试Mybatis-Plus为什么封装的Insert:

1
2
3
4
5
@Test
public void TestUserInsert() {
int row = userMapper.insert(User.builder().password("aaaa").username("bbbb").enabled(1).build());
Assert.assertEquals(row, 1);
}

可以看到日志:

1
2
2020-01-20 09:51:32.021 DEBUG org.apache.ibatis.logging.jdbc.BaseJdbcLogger.debug(BaseJdbcLogger.java:143) 2CNU7X5OLAUE004 --- [           main] c.e.d.m.U.insert                         : ==>  Preparing: INSERT INTO users ( username, password, enabled ) VALUES ( ?, ?, ? ) 
2020-01-20 09:51:32.036 DEBUG org.apache.ibatis.logging.jdbc.BaseJdbcLogger.debug(BaseJdbcLogger.java:143) 2CNU7X5OLAUE004 --- [ main] c.e.d.m.U.insert : ==> Parameters: bbbb(String), aaaa(String), 1(Integer)

其他高端操作请阅读相关文档https://mp.baomidou.com/guide/quick-start.html

Spring Boot整合Druid数据库连接池

在Spring Boot 2.X默认使用了HikariCP作为数据库连接池,据说hikariCP性能最高(hikariCP>druid>dbcp>c3p0),但是我更喜欢Druid全面的功能和毫不逊色的性能。
开撸吧,首先当然还是引入我们的需要的Druid依赖包:

1
2
3
4
5
6
<!-- https://mvnrepository.com/artifact/com.alibaba/druid-spring-boot-starter -->
<dependency>
<groupId>com.alibaba</groupId>
<artifactId>druid-spring-boot-starter</artifactId>
<version>1.1.21</version>
</dependency>

接下来就是修改我们的的application.yml配置:

1
2
3
4
5
6
7
8
9
10
11
12
13
spring:
datasource:
driver-class-name: org.mariadb.jdbc.Driver
url: jdbc:mysql://127.0.0.1:3306/nacos_config?useUnicode=true&characterEncoding=UTF-8&allowMultiQueries=true
username: root
password: root
### 连接池配置
druid:
initial-size: 50
max-active: 200
min-idle: 50
max-wait: 50
validation-query: SELECT 1

可以看到我们的日志信息为:

1
2
2020-01-20 10:14:54.581  INFO com.alibaba.druid.pool.DruidDataSource.close(DruidDataSource.java:2003) 2CNU7X5OLAUE004 --- [extShutdownHook] c.a.d.p.DruidDataSource                  : {dataSource-1} closing ...
2020-01-20 10:14:54.691 INFO com.alibaba.druid.pool.DruidDataSource.close(DruidDataSource.java:2075) 2CNU7X5OLAUE004 --- [extShutdownHook] c.a.d.p.DruidDataSource : {dataSource-1} closed

现在我们增加一个Controller来获取Druid的监控数据:

1
2
3
4
5
6
7
8
@RestController
public class DruidStatController {
@GetMapping("/druid/status")
public Object druidStat(){
// DruidStatManagerFacade#getDataSourceStatDataList 该方法可以获取所有数据源的监控数据,除此之外 DruidStatManagerFacade 还提供了一些其他方法,你可以按需选择使用。
return DruidStatManagerFacade.getInstance().getDataSourceStatDataList();
}
}

访问http://localhost:8080/druid/status可以得到一个json:

1
2
3
4
5
6
7
8
9
10
11
12
13
14
15
16
17
18
19
20
21
22
23
24
25
26
27
28
29
30
31
32
33
34
35
36
37
38
39
40
41
42
43
44
45
46
47
48
49
50
51
52
53
54
55
56
57
58
59
60
61
62
63
64
65
66
67
68
69
70
71
[{
"Identity": 1914285129,
"Name": "DataSource-1914285129",
"DbType": "mysql",
"DriverClassName": "org.mariadb.jdbc.Driver",
"URL": "jdbc:mysql://127.0.0.1:3306/nacos_config?useUnicode=true&characterEncoding=UTF-8&allowMultiQueries=true",
"UserName": "root",
"FilterClassNames": [],
"WaitThreadCount": 0,
"NotEmptyWaitCount": 0,
"NotEmptyWaitMillis": 0,
"PoolingCount": 50,
"PoolingPeak": 50,
"PoolingPeakTime": "2020-01-20T02:26:22.466+0000",
"ActiveCount": 0,
"ActivePeak": 0,
"ActivePeakTime": null,
"InitialSize": 50,
"MinIdle": 50,
"MaxActive": 200,
"QueryTimeout": 0,
"TransactionQueryTimeout": 0,
"LoginTimeout": 0,
"ValidConnectionCheckerClassName": null,
"ExceptionSorterClassName": null,
"TestOnBorrow": false,
"TestOnReturn": false,
"TestWhileIdle": true,
"DefaultAutoCommit": true,
"DefaultReadOnly": null,
"DefaultTransactionIsolation": null,
"LogicConnectCount": 0,
"LogicCloseCount": 0,
"LogicConnectErrorCount": 0,
"PhysicalConnectCount": 50,
"PhysicalCloseCount": 0,
"PhysicalConnectErrorCount": 0,
"DiscardCount": 0,
"ExecuteCount": 0,
"ExecuteUpdateCount": 0,
"ExecuteQueryCount": 0,
"ExecuteBatchCount": 0,
"ErrorCount": 0,
"CommitCount": 0,
"RollbackCount": 0,
"PSCacheAccessCount": 0,
"PSCacheHitCount": 0,
"PSCacheMissCount": 0,
"StartTransactionCount": 0,
"TransactionHistogram": [0, 0, 0, 0, 0, 0, 0],
"ConnectionHoldTimeHistogram": [0, 0, 0, 0, 0, 0, 0, 0],
"RemoveAbandoned": false,
"ClobOpenCount": 0,
"BlobOpenCount": 0,
"KeepAliveCheckCount": 0,
"KeepAlive": false,
"FailFast": false,
"MaxWait": 50,
"MaxWaitThreadCount": -1,
"PoolPreparedStatements": false,
"MaxPoolPreparedStatementPerConnectionSize": 10,
"MinEvictableIdleTimeMillis": 1800000,
"MaxEvictableIdleTimeMillis": 25200000,
"LogDifferentThread": true,
"RecycleErrorCount": 0,
"PreparedStatementOpenCount": 0,
"PreparedStatementClosedCount": 0,
"UseUnfairLock": true,
"InitGlobalVariants": false,
"InitVariants": false
}]

我们还可以打开stat-view-servlet,需要加入如下配置:

1
2
3
4
5
6
7
spring:
datasource:
druid:
stat-view-servlet:
enabled: true
login-username: admin
login-password: admin

这是启动后,访问http://localhost:8080/druid/index.html页面就会跳转到登录页面,输入我们配置的用户名和密码admin/admin:


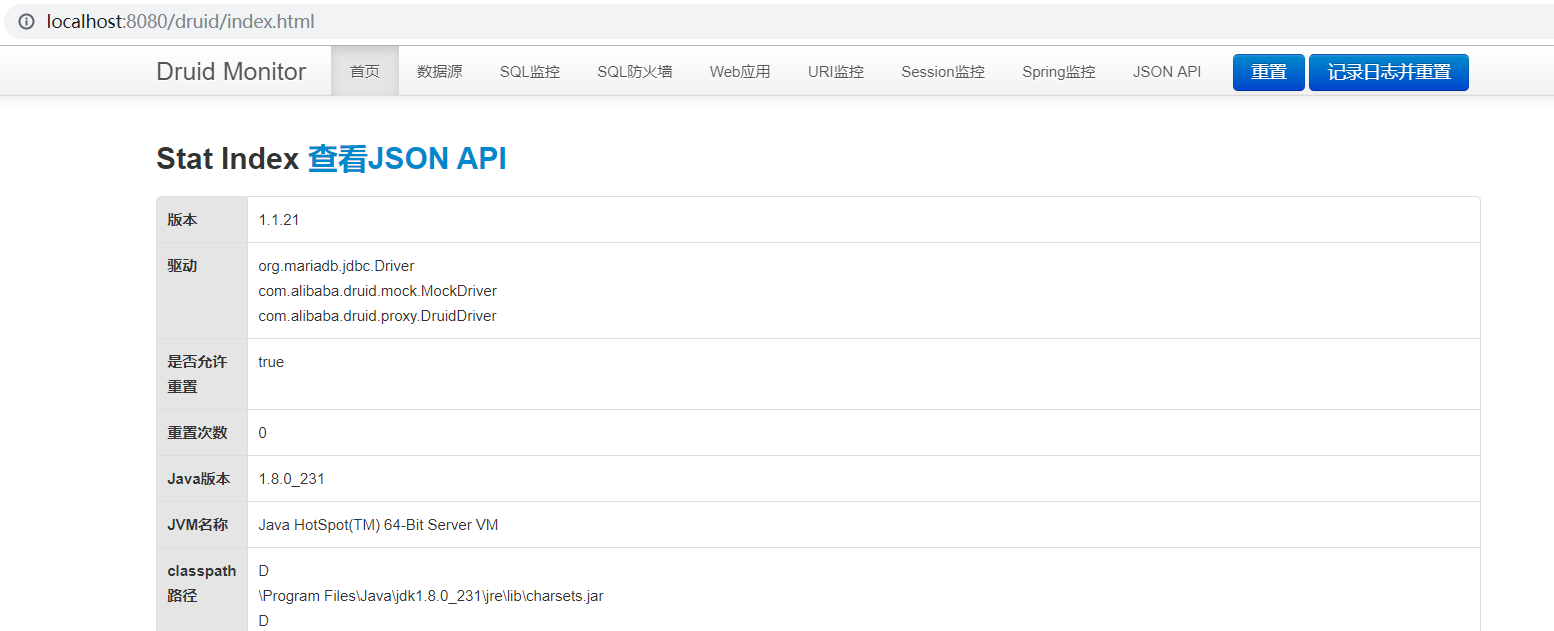
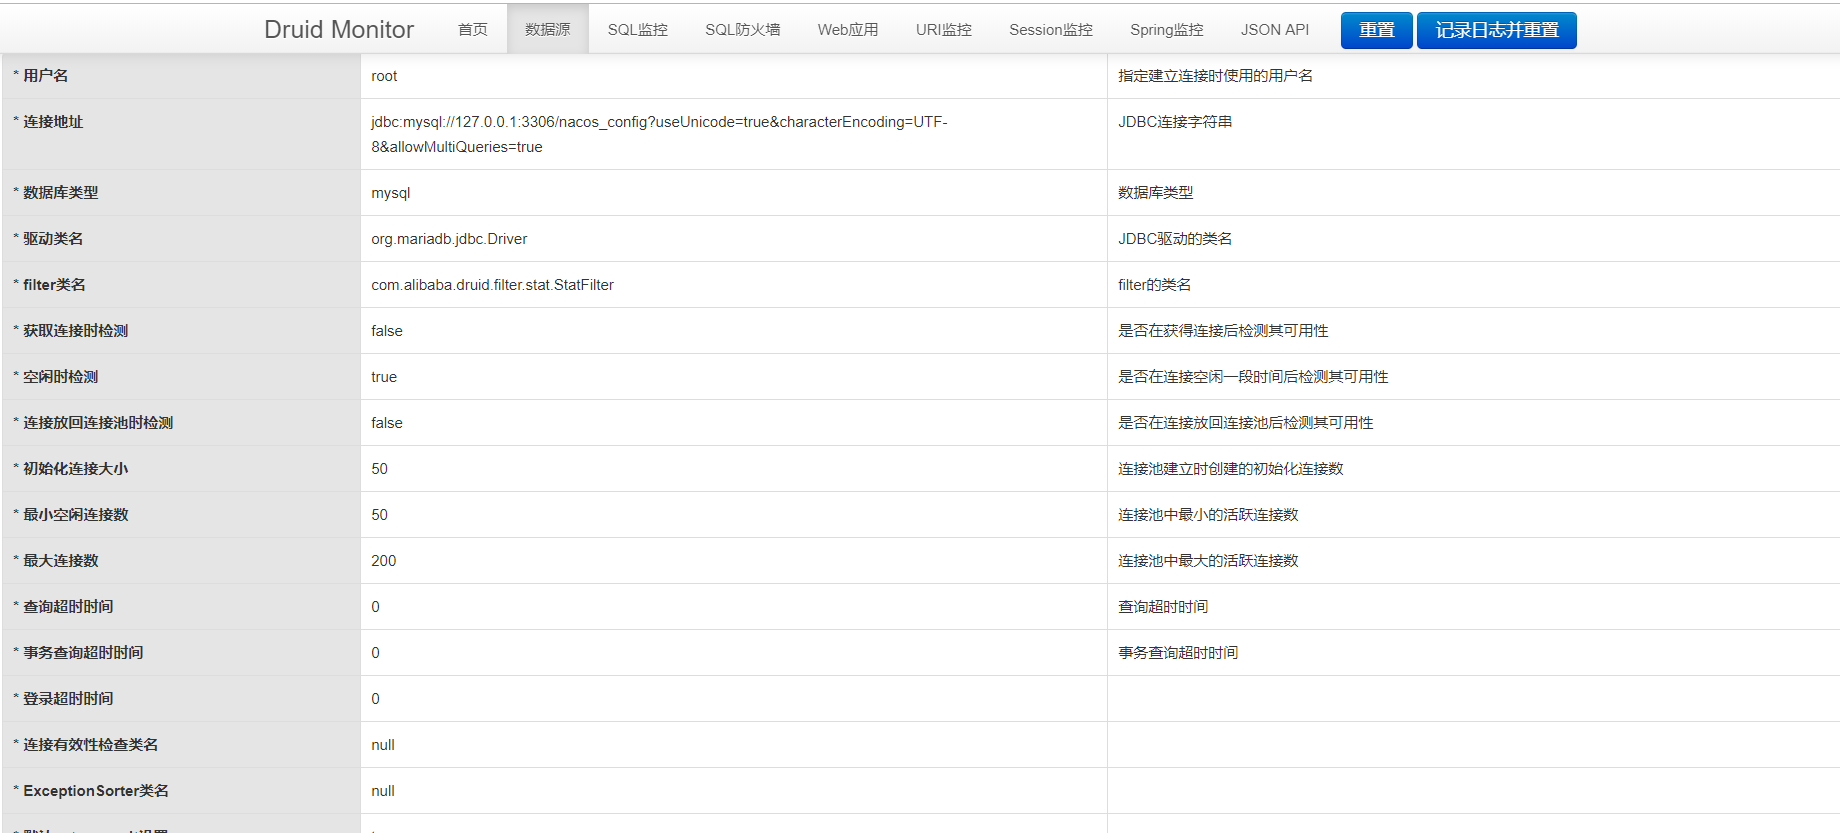
可以看到Druid提供的功能是比较全面的,另外在第三张图可以看到我们的相关参数,大家也可以参照这个来配置连接池。

MyBatis-Plus的代码生成器

Mybatis有Generator工具为我们提高编码效率,MyBatis-Plus也不示弱,它也提供有MyBatis-Plus AutoGenerator 。在上面的简单实体只有3个属性,加入有几十个属性怎么办呢?这时候AutoGenerator就可以帮我们一个大忙。首先引入所需包:

1
2
3
4
5
6
7
8
9
10
11
12
<!-- https://mvnrepository.com/artifact/com.baomidou/mybatis-plus-generator -->
<dependency>
<groupId>com.baomidou</groupId>
<artifactId>mybatis-plus-generator</artifactId>
<version>3.3.0</version>
</dependency>
<!-- https://mvnrepository.com/artifact/org.apache.velocity/velocity-engine-core -->
<dependency>
<groupId>org.apache.velocity</groupId>
<artifactId>velocity-engine-core</artifactId>
<version>2.1</version>
</dependency>

新建CodeGenerator类:

1
2
3
4
5
6
7
8
9
10
11
12
13
14
15
16
17
18
19
20
21
22
23
24
25
26
27
28
29
30
31
32
33
34
35
36
37
38
39
40
41
42
43
44
45
46
47
48
49
50
51
52
53
54
55
56
57
58
59
60
61
62
63
64
65
66
67
68
69
// 演示例子,执行 main 方法控制台输入模块表名回车自动生成对应项目目录中
public class CodeGenerator {

/**
* <p>
* 读取控制台内容
* </p>
*/
public static String scanner(String tip) {
Scanner scanner = new Scanner(System.in);
StringBuilder help = new StringBuilder();
help.append("请输入" + tip + ":");
System.out.println(help.toString());
if (scanner.hasNext()) {
String ipt = scanner.next();
if (StringUtils.isNotBlank(ipt)) {
return ipt;
}
}
throw new MybatisPlusException("请输入正确的" + tip + "!");
}

public static void main(String[] args) {
// 代码生成器
AutoGenerator mpg = new AutoGenerator();

// 全局配置
GlobalConfig gc = new GlobalConfig();
String projectPath = System.getProperty("user.dir");
gc.setOutputDir(projectPath + "/src/main/java");
gc.setAuthor("eyiadmin");
gc.setOpen(false);
// gc.setSwagger2(true); 实体属性 Swagger2 注解
mpg.setGlobalConfig(gc);

// 数据源配置
DataSourceConfig dsc = new DataSourceConfig();
dsc.setUrl("jdbc:mysql://localhost:3306/nacos_config?useUnicode=true&useSSL=false&characterEncoding=utf8");
// dsc.setSchemaName("public");
dsc.setDriverName("org.mariadb.jdbc.Driver");
dsc.setUsername("root");
dsc.setPassword("root");
mpg.setDataSource(dsc);

// 包配置
PackageConfig pc = new PackageConfig();
pc.setModuleName(scanner("模块名"));
pc.setParent("com.eyiadmin.demo");
mpg.setPackageInfo(pc);


String templatePath = "/templates/mapper.xml.vm";

// 自定义输出配置
List<FileOutConfig> focList = new ArrayList<>();
// 自定义配置会被优先输出
focList.add(new FileOutConfig(templatePath) {
@Override
public String outputFile(TableInfo tableInfo) {
// 自定义输出文件名 , 如果你 Entity 设置了前后缀、此处注意 xml 的名称会跟着发生变化!!
return projectPath + "/src/main/resources/mapper/" + pc.getModuleName()
+ "/" + tableInfo.getEntityName() + "Mapper" + StringPool.DOT_XML;
}
});

mpg.execute();
}

}

我用的官网提供的默认方式,运行后会生成对应的controllerentitymapperservice代码。也支持自定义模版https://mp.baomidou.com/guide/generator.html

Knife4j的使用

这里我引入了Knife4j包:

1
2
3
4
5
6
<!-- https://mvnrepository.com/artifact/io.springfox/springfox-swagger2 -->
<dependency>
<groupId>com.github.xiaoymin</groupId>
<artifactId>knife4j-spring-boot-starter</artifactId>
<version>2.0.1</version>
</dependency>

新建一个SwaggerConfiguration类配置我们的Swagger:

1
2
3
4
5
6
7
8
9
10
11
12
13
14
15
16
17
18
19
20
21
22
23
24
25
@Configuration
@EnableSwagger2
@EnableKnife4j
@Import(BeanValidatorPluginsConfiguration.class)
public class SwaggerConfiguration {
@Bean("createRestApi")
public Docket createRestApi() {
return new Docket(DocumentationType.SWAGGER_2)
.apiInfo( new ApiInfoBuilder()
//页面标题
.title("Demo Web Api文档")
//创建人
.contact(new Contact("eyiadmin", "https://springfox.github.io/springfox/", "eyiadmin@163.com"))
.version("1.0")
.description("Demo Web Api文档")
.build())
.select()
//API接口所在的包位置
.apis(RequestHandlerSelectors.basePackage("com.eyiadmin.demo.controller"))
.paths(PathSelectors.any())
.build();

}

}

新建一个名为UserControllerController:

1
2
3
4
5
6
7
8
9
10
11
12
13
14
@RequestMapping("/v1/user")
@RestController
@Api(tags = "User API展示")
public class UserController {

@Autowired
UserMapper userMapper;

@GetMapping("/list")
public ResponseResult<?> getUserList()
{
return ResponseResult.success(userMapper.selectList(null));
}
}

启动起来,访问localhost:8080/doc.html:

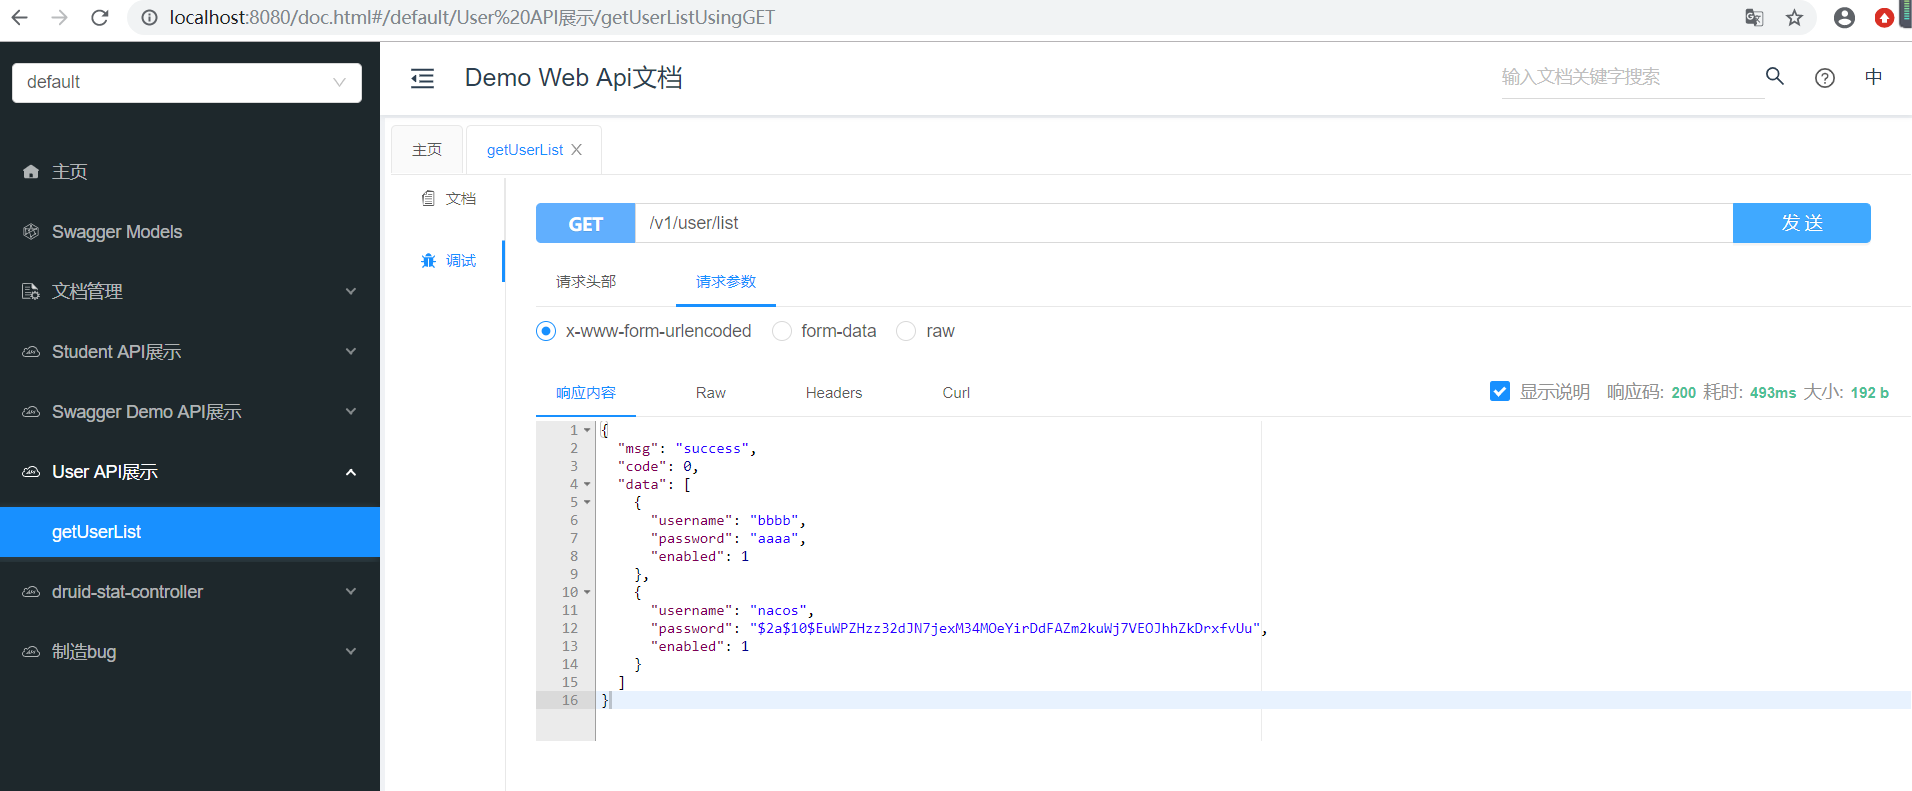
调用我们的接口,可以看到Druid监控到了我们SQL语句的执行情况

过于Swagger也可以看看我之前的一篇文章Spring Boot集成Swagger

若有不足之处还望指正,多谢。欢迎感兴趣的朋友与我多多交流

参考
MyBatis-Plus
https://github.com/alibaba/druid/tree/master/druid-spring-boot-starter
knife4j

You forgot to set the qrcode for Alipay. Please set it in _config.yml.
You forgot to set the qrcode for Wechat. Please set it in _config.yml.
You forgot to set the business and currency_code for Paypal. Please set it in _config.yml.
You forgot to set the url Patreon. Please set it in _config.yml.
Your browser is out-of-date!

Update your browser to view this website correctly. Update my browser now

×